
How to Apply Thermal Glue Properly: A Step-by-Step Tutorial
Date:2026-07-14
How to Apply Thermal Glue Properly: A Step-by-Step Tutorial
In the fast-paced world of 2026 electronics, we are seeing more "screw-less" designs than ever before. From ultra-compact AI edge sensors to high-vibration EV battery monitors, thermal glue (thermal adhesive) has become the go-to for designers who need a structural bond that also moves heat. But unlike thermal paste, you don’t get a "do-over." Once that chemical cross-linking begins, that heatsink and chip are in it for the long haul.
At Sheen Electronic Technology, our lab techs have seen plenty of horror stories—mostly involving "overflow" that shorts out motherboards or "air pockets" that turn a 40°C chip into a 100°C disaster. In this thermal glue apply tutorial, we’ll walk through the entire thermal adhesive application process, make sure to apply correctly in one go.
How to Apply Thermal Glue Properly (Quick Answer)
Applying thermal glue correctly comes down to five essential steps. First, thoroughly clean both bonding surfaces with high-purity isopropyl alcohol to remove dust, grease, and old thermal material. Next, apply a small amount of thermal glue using a dispensing pattern that matches the component size. Carefully lower the heatsink or component straight into place, applying steady, even pressure to create a thin, uniform bond line while avoiding trapped air. Remove any excess adhesive before it begins to cure, then allow the thermal glue to fully cure according to the manufacturer's specifications before powering on the device.
The key is not using more adhesive—it's creating the thinnest continuous thermal bridge possible. A properly applied bond improves heat transfer, strengthens mechanical attachment, and helps ensure long-term reliability in everything from CPUs to EV battery modules.
Need exact thermal conductivity, curing time, bond strength, flame-retardant ratings, and application specifications before selecting a thermal adhesive? Download the product datasheets to compare Sheen's TIV Series thermal adhesives and PU Series thermal conductive adhesives for CPUs, power modules, EV battery packs, and industrial electronics.
Tools and Materials Needed for Thermal Glue Application
Before any adhesive touches a heatsink or chip, preparation matters. In electronics assembly, the right tools aren’t just about convenience—they’re about repeatability and consistency.
• 99% Isopropyl Alcohol (IPA): The standard 70% stuff contains too much water; go for high-purity to ensure zero residue.
• Lint-Free Microfiber Wipes: Standard paper towels leave behind "forests" of microscopic wood fibers that act as thermal insulators.

• Sheen TIV Series (Single-Component): Ideal for quick application; it offers high-strength fixation and flame retardancy right out of the tube.

• Sheen PU Series (Two-Component): Perfect for lithium battery packaging where cushioning and rapid, heat-accelerated curing are required (1:1 mix ratio).
• Mixing Nozzles & ESD Gear: For two-component glues, a static mixer is essential for a perfect chemical balance.
Think of these tools as your defense against the "Big Three" of bond failure: oil, dust, and improper mixing. Using controlled tools allows engineers to maintain consistent adhesive thickness, which directly affects thermal performance.
Stage 1: Surface Cleaning Phase
Surface preparation is 90% of the battle in any thermal glue tutorial. Thermal glue relies on molecular-level contact to create both a mechanical bond and a thermal pathway. Any microscopic film of finger oil or factory residue acts as a "heat dam." In the 2026 landscape of high-density lithium battery modules, even a single skin flake can create a void large enough to cause a localized hotspot that eventually leads to delamination.
• The Strip: Remove any old material using a plastic scraper—never use metal, as a single scratch in the die surface creates an air-trap.
• The Scrub: Use a fresh lint-free wipe soaked in 99% IPA for each surface (the chip and the heatsink/cold plate).
• The Inspection: Use a bright light to check for "ghosting" or oily streaks. If it isn't mirror-clean, clean it again.
• The No-Touch Zone: Once cleaned, avoid breathing directly on the surfaces or touching them.
If the surface isn't chemically clean, the adhesive will "wet" the contaminants instead of the substrate. This leads to poor heat transfer and a bond that might snap under the slightest vibration. Treat the cleaning phase with the respect it deserves, and your Sheen TIV or PU bond will achieve its full rated strength.
Stage 2: Choosing Your Dispensing Pattern
How you put the glue on the substrate determines how the air gets out. When you press a heatsink onto a glob of glue, the material spreads outward. If you apply it in a "ring" or a messy "scribble," you will trap air in the center. In 2026, with battery packs getting denser and chips getting hotter, air pockets (voids) are the primary cause of early component failure because they act as thermal blankets.
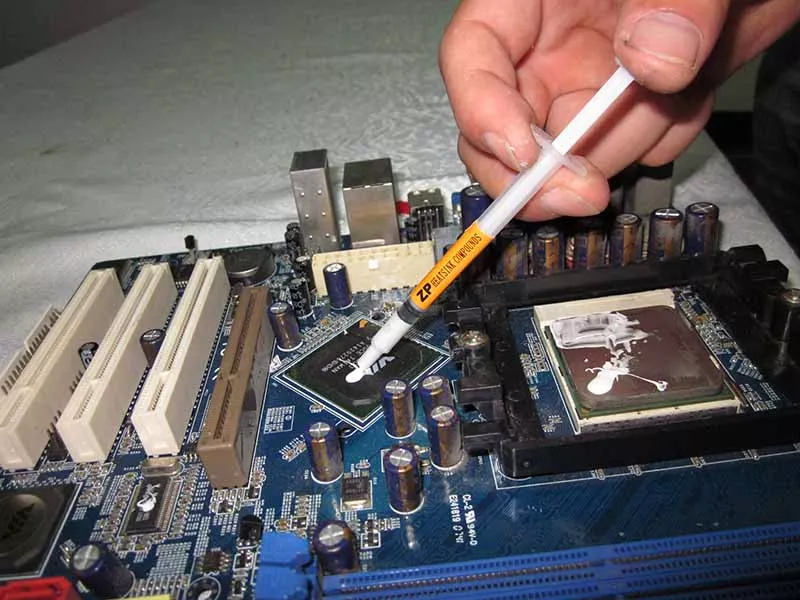
A:The "Pea" Method: The classic. A single drop in the exact center is perfect for small components like MOSFETs. Advantages:
• easy to apply
• minimal adhesive waste
• effective for small components
However, if the dot is too small, the adhesive may not spread across the entire surface.
B:The cross pattern combines two intersecting adhesive lines. This method provides improved coverage for larger surfaces. Benefits include:
• more uniform adhesive distribution
• reduced risk of air pockets
• better spread under pressure
C:The "Parallel Bead": Often used in lithium battery packaging to create a "cushioning" effect while ensuring a steady path for heat transfer.
D:Manual Spreading (The Forbidden Technique): Never spread the glue with a card; it introduces thousands of micro-bubbles into the glue matrix.

The goal is to maximize the surface area while minimizing the "Bond Line Thickness" (BLT). A center-out or parallel-bead spreading technique ensures that the air is pushed to the perimeter, leaving a dense, bubble-free thermal bridge that allows phonons to move efficiently from the source to the sink.
Stage 3: The "Squeeze" – Mounting and Pressure
Once the glue is down, the clock is ticking—especially for the Sheen TIV series, which has a surface drying time of just 5-10 minutes. You need to place your components with steady hands and a "one-and-done" mindset. "Wiggling" the heatsink or lifting it back up after contact is the fastest way to ruin the bond and introduce air. You are looking for a "uniform squish" where the glue reaches the edges but doesn't overflow onto delicate SMDs.
• The Vertical Drop: Lower the component perfectly vertically to avoid "beaching" the glue on one side.
• Steady Downward Pressure: Apply firm pressure for at least 30 seconds. For lithium battery cells, ensure the pressure is sufficient for "high-strength fixation" but not so high that it deforms the cell casing.
• Manage the "Ooze": If glue squirts out, you used too much. Clean the excess immediately with a dry swab before the skin forms.
• Static Positioning: Once the bond line is set, do not rotate the heatsink; shearing the forming polymer chains weakens the structural cushion.
Mounting is a game of even force. You want the thinnest possible layer of glue that still covers the entire surface. Remember: the thinner you can get that layer while maintaining contact, the better your cooling will be, while Sheen's PU adhesive provides that necessary cushioning to absorb mechanical shocks.
Stage 4: Curing – The "Wait and See"
Curing is where the chemistry happens. In 2026, we categorize curing by the material’s chemistry. If you power up your device before the glue has fully "cross-linked," the thermal expansion of the chip or battery cell will cause the soft glue to expand and "delaminate," creating a permanent air gap.
| Adhesive Type | Surface Dry / Skin Time | Full Cure (Natural) | Fast Cure Options |
| Sheen TIV (1-Part) | 5 - 10 Minutes | 24 Hours | None (Natural cure) |
| Sheen PU (2-Part) | 5 - 10 Minutes | 24 Hours | Rapid Heat-Accelerated |
• The TIV Rule: While it skins over quickly, don't stress the bond for the full 24 hours to ensure high-strength fixation.
• The PU Rule: Mixed at 1:1, this can be "snap-cured" in an oven for mass production efficiency in battery lines.
• The "No-Load" Rule: Do not move the PCB or plug in cables during the cure cycle.
Respect the chemical timeline. Whether it's the 5-minute skin time of the TIV or the heat-accelerated PU, powering up a "half-baked" bond is the leading cause of product RMAs. Give the molecules time to shake hands and get comfortable.
Choosing the Right Application Method for Different Devices
Not every electronic assembly requires the same application technique. The ideal dispensing pattern depends on the component size, contact area, and mechanical requirements. Selecting the proper method helps minimize trapped air, maintain a consistent bond line thickness (BLT), and achieve more reliable thermal performance.
| Application | Recommended Pattern | Why It Works |
| CPU & GPU Heatsinks | Center "Pea" Method | Even mounting pressure naturally spreads the adhesive across the processor surface while minimizing excess squeeze-out. |
| LED Modules | Small Cross Pattern | Provides more uniform coverage across rectangular LED substrates and improves heat transfer to the metal-core PCB or heatsink. |
| MOSFETs & Power ICs | Small Center Dot | Compact packages require only a minimal amount of adhesive to avoid overflow onto nearby components. |
| Power Modules & IGBTs | Cross Pattern | Larger contact areas benefit from multiple flow paths that reduce the risk of trapped air pockets. |
| Lithium Battery Modules | Parallel Beads | Long adhesive beads create continuous thermal pathways while providing the cushioning needed to absorb vibration and thermal expansion. |
Regardless of the application, the objective remains the same: achieve full surface contact with the thinnest practical adhesive layer. Applying more thermal glue does not improve cooling—in fact, excessive adhesive increases thermal resistance and may overflow onto surrounding components. When in doubt, start with less adhesive, allow mounting pressure to spread it naturally, and inspect the bond line after assembly for even coverage.
Need a closer match for your project? Browse related application pages to see how thermal conductive adhesives are used in EV battery modules, power electronics, LED assemblies, AI servers, CPUs, GPUs, and other high-performance electronic systems.
Common Mistakes and Reworking
What happens if you realize the heatsink is crooked or you used too much glue? In 2026, "Right to Repair" has pushed us to develop some reworkable glues, but for most industrial adhesives, "hard" means "permanent." Knowing how to spot a "bad stick" early can save you from shipping a defective battery pack that will inevitably overheat in the field.
• Using Too Much Adhesive
A common misconception is that more adhesive improves bonding. In reality, thicker adhesive layers increase thermal resistance. The goal is always thin and uniform coverage.
• Poor Surface Cleaning
Skipping cleaning is one of the fastest ways to ruin thermal performance. Contamination reduces adhesion and creates thermal barriers.
• Improper Mixing of Two-Part Adhesives Two-part epoxy adhesives must be mixed thoroughly. Poor mixing results in:
☆ incomplete curing
☆ weak bonding
☆ inconsistent thermal conductivity
• Rework Limitations. Unlike thermal paste, most thermal adhesives create permanent bonds. Removing a bonded heatsink often requires:
☆ heat application
☆ mechanical force
☆ solvents
☆ And occasionally… patience and creative problem-solving.
Avoiding common mistakes ensures reliable thermal bonding and prevents overheating issues. Since thermal glue bonds permanently, careful application is essential to avoid costly rework.
FAQ
Can I use TIV on high-power lithium batteries?
Yes, it is widely used for lithium battery packaging because of its flame retardancy and high fixation strength.
Do I have to mix PU 1:1 exactly?
Yes. An off-ratio mix will result in a bond that stays tacky or fails to reach its full thermal conductivity.
What if I need the glue to act as a cushion?
The Sheen PU series is specifically formulated to provide cushioning while maintaining high-efficiency heat transfer.
How thick should thermal glue be?
Most electronics applications require a bondline thickness between 0.1 mm and 0.3 mm.
Can thermal glue replace screws for heatsinks?
In many small electronics designs, thermal adhesives can replace mechanical fasteners, simplifying assembly and reducing part count.
How long does thermal glue take to cure?
Curing time depends on the adhesive type and can range from a few minutes to 24 hours.
Is thermal glue electrically conductive?
Most thermal adhesives are electrically insulating, although some silver-filled formulations may be conductive.
Can thermal glue be removed?
Removal is difficult after curing and usually requires heat, solvents, or mechanical separation.
Learning how to apply thermal glue properly is a rite of passage for any serious electronics designer or assembly tech. It is the perfect marriage of chemistry and mechanical engineering. Using Sheen Technology's TIV and PU series ensures you aren't just gluing parts together—you are creating a high-strength, flame-retardant thermal bridge that protects your hardware.
【Request a Custom Quote】 Not sure which thermal adhesive is right for your CPU, GPU, LED module, power electronics, or EV battery application? Send us your operating temperature range, substrate materials, curing requirements, bond line thickness, and thermal performance goals, and our engineers will recommend the most suitable thermal adhesive solution for your project.


